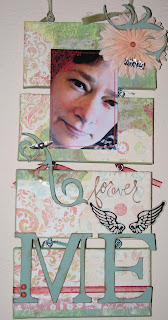
Did I mention I've given up altering stuff, Ya Right!

So it's true, I have not done an altered project in months. I shied away from all things that are not scrapbooking. Even dropped off my scarf knitting . (LOL) Who needs 10 scarves in various colors, I don't wear them and the cat has lots of new toys to play with once she found my knitting bag.
But all things being creative, and of course, one of Donna Downey classes I created something I am so pleased about. Canvas. Yep, I did it. Used my new favorite colors, soft Hawaii tropics. Don't ask me what colors, but they go well my newly finished mini book for Hawaii. Don't ask about pictures or when the trip is. I don't have one scheduled or planned.
But I digress. Back to the canvas.
Step 1: Minnesota, four sheets of patterned paper cause I thought it might look good with my paints. Not that I don't have a shelf full of paper at home. Knowing full well I can't put more than two patterned papers on a page. I have pattern paper phobia. Don't know the pysch term for it. But I dread mixing patterns. Uhm, Hello! That's why scrapbook manufacturers make so many shades of cardstock.
Step 2: Get home later than snot from airport, run around trying to pack stuff for next morning. OMG, its 2 something AM. Go to bed. I have the most important stuff, paint, paper and canvas. Oh ya and Gel medium.
Step 3: Get up late, get to class 15 minutes late. Apologize profusely to all ladies glaring at me for holding up class.
Step 4: Directly drizzled MM paint onto canvas, I feel slightly queasy right about now. Donna always inspires you to take risks, no sissy paper plates and dabbing the paint on with a brush.
Step 5: Push that stuff around with my foam brush, oops, maybe foam's not the best. But Michaels had them on sale 20 gazillon for $1. Can't pass up a sale. Darn, to much green and not enough red blotches.
Step 6: More paint on top of canvas. Keep pushing it around, go for the artistic blobs of reddish pink and put some more blue on top the yellow. Rats, too much green all over!
Step 7: The cool altered technique with old newsprint, phone books, old dictionary pages or something double sided with words. Get out that gel medium, spread it around layer on that newsprint, ( thought I was so smart searching for cool designs) reminder to self, give up the planning and go with the flow. Apply not too sticky and not to unsticky masking tape to newsprint. Give it some drying time. You'll be able to tell when its done by pulling up paper by masking tape. It leaves the most awesome layers of paper and reverse print on your canvas. Rub, sand and go over paper and remaining print to soften. Or you can take Donna's class and learn from the master herself!
Step 8: Get out the dreaded pattern paper. Here's where I almost stopped. I created this masterpiece of paint and gelled paper, but problem was my painting didn't match the paper. Donna came to the rescue and pointed out that covering my big patch of yellow softened the whole look. OMG, I am having fun now!
Step 9: Jump up and run out to the store, (Scrapbook Pad in Colleyville is a great store) find cool stuff for my canvas. What do I want to say? What is this about? Well of course its about me! Its been about me all along, and how being creative sets me free. HA, some wings, some chipboard, and some GD expense flowers later, I think I might have a plan. Don't forget the stamping.
Step 10: Pack it all up, because Bernie's rule of thumb never finish creating today, what you can finish creating tomorrow.
Step 11: At home. Struggle with finding photo, what to put on the canvas, of course it's about me, but I can't take a decent picture of me. All photos make me look fat, oops, that's because I am. What's the trick to taking skinny photos? No one shares that! Muddle through photos. I love my camera, I don't know how to work half of the stuff on it and it's not a fancy shmancy one, but it takes a good pic.
Step 12: K, I like the picture, but it must be adjusted, digitally fixed to remove all of the flaws. Never mind all my flaws, I'll just artsy up the photo. So you can't tell which flaws are mine and which are the artsy stuff, I put there on purpose. Did you know you can draw in extra eyelashes? Too cool, except the first time I tried it looked like Spiders were crawling out of my upper eyelids. Don't try this on eyebrows, I gave myself some caterpillers every time I tried. Good enough photo send to printer. I love my little Epson!
Step 13: Leave all pieces laying on canvas for a few days while I move them around adjusting the layout. Remember rule of thumb. Finally, positioned, wait a few more days and stick those things down. Wait a few more days to take picture of art.
Step 14: Write this incredibly long post explaining the wonderful process to tell in three words, Donna inspires me! Put the post and the picture of work on blog.
Scrapbdazzled

